i have been trying to figure out on my own, on how to reverse the polarity of a motor by using transistors.
when i was playing around with the transistors, i noticed some neat things that could happen when you hooked up pnp and npn transistors together, as well as the fact that if you combined transistors you could get one heck of a current boost rather than just using one.
in the end, i think i ended up just re-inventing the h-bridge, since it looks a heck of a lot like one, but it is nice to come up with it on my own.
here is the cicruit diagram i am going to try out tonight:
http://web.ncf.ca/ex809/circuit.gif
from what i can see it should work, and only requires two inputs for motor control.
chris
dc motor driver circuit
Moderator: Moderators
-
Mike

- Herr VC
- Posts: 4901
- Joined: Wed Dec 01, 2004 1:57 pm
- Location: Munich, Germany
- Occupation: electrical engineer
If you put +5 Volts to the left I/O Line, the left NPN will open, while the PNP will shut off. Additionally if you put 0 Volts to the right I/O line, you'll short circuit the upper right PNP and lower left NPN transistor, probably not what you've intended.
The H-Bridge can be made of four relay switches, or, alternatively four transistors in a double "totem-pole" circuit as follows:
(Warning: ASCII-art)
As long as either +5V or 0 Volts are applied to the I/O's, there is no big power loss within the transistors, they only need to cope with the current through the motor. You must avoid intermediate voltages at the I/O's (here between +0.7 V ... +4.3 V), as they again will open both transistors on one side, and lead to a much greater current through the left- and/or right-hand side transistors.
Michael
(Edit: I put "totem-pole" in quotes, as said arrangement would have all transistors put together as emitter followers, i.e. NPN's top, PNP's bottom, C's & E's swapped (i.e. E's connected) - this is what is used in amplifiers - it would work here as well, but would reduce the +5V by 2*0.7V U_BE each. In the circuit above the transistors are indeed used as switches.)
(Edit2: I deleted the circuit, as it wouldn't work ... so hopefully no-one else can try it without reading Lee's following post. )
)
The H-Bridge can be made of four relay switches, or, alternatively four transistors in a double "totem-pole" circuit as follows:
(Warning: ASCII-art)
Code: Select all
(Schematic deleted)Michael
(Edit: I put "totem-pole" in quotes, as said arrangement would have all transistors put together as emitter followers, i.e. NPN's top, PNP's bottom, C's & E's swapped (i.e. E's connected) - this is what is used in amplifiers - it would work here as well, but would reduce the +5V by 2*0.7V U_BE each. In the circuit above the transistors are indeed used as switches.)
(Edit2: I deleted the circuit, as it wouldn't work ... so hopefully no-one else can try it without reading Lee's following post.
Last edited by Mike on Wed Oct 05, 2005 12:58 am, edited 1 time in total.
thanks for your diagram mike.
i am printing it up now
perhaps i am not understanding you correctly, but from what i can see from my diagram, as long as i don't activate both I/O lines at the same time, i should be fine?
I/O left goes high, the circuit closes from +5 volts through the left PNP then the motor then the left NPN and then ground
I/O right goes high, the circuit closes from +5 volts through the right PNP then the motor then the right NPN and then ground
i used a fuzzy line for right PNP to the motor to try and show that the lines are not actually connected to the ones it goes over in the diagram.
chris
-
Mike
- Herr VC
- Posts: 4901
- Joined: Wed Dec 01, 2004 1:57 pm
- Location: Munich, Germany
- Occupation: electrical engineer
Uhh, yes! 
You need two additional transistors, to prevent that happen.
I found a diagram at http://vsim.freeservers.com/walk-kit.html for a H-Bridge:
Me sorry,
Michael
You need two additional transistors, to prevent that happen.
I found a diagram at http://vsim.freeservers.com/walk-kit.html for a H-Bridge:
Me sorry,
Michael
There's a lot on the web that is poor, less that is ok ish and very little that is good. That circuit is ok ish but not good.
Even with the extra transistors there is no protection against overcurrent. This may be ok for a toy that is only expected to be used for < 100 hours in it's lifetime (and there are other reasons why the toy doesn't die immediately) but isn't good in practice.
Adding two resistors as below will protect the circuit against overcurrent but still allow the transistors to be turned hard on and reduce switch losses (it won't get as hot as one that doesn't).

But how do you calculate the resistor values? Get the parameters for the transistors used, both the 2N2222 and 2N2907 have similar specs, and find the gain. This is usually labeled Hfe and will probably appear like this.
Hfe 200 @ 150mA Ic
So the gain is 200, don't worry about the '@ 150mA Ic', this is just the current at which the gain is specified.
Next you need the current that you want to switch, the 2N2907 can handle 600mA Ic max and to switch that will need ..
Ib = Ic/Hfe
Ib = 600/200
Ib = 3mA
So now we have the base current that is needed to turn on the output transistors but to find the resistor value we need to find the voltage that will appear across the resistor.
Assuming a supply of 12V
Vr = 12 - 3*VBE - Vsat
Where VBE is the base emitter volt drop for the three transistors and Vsat is the minimum voltage across the driver transistor when it is on. plugging in the numbers gives ..
Vr = 12 - 3*0.6 - 0.2
Vr = 12 - 1.8 - 0.2
Vr = 10 volts
Now we can work out a value for R using ohms law ..
R = V/I
R = 10/.003
R = 3333.33 ohms
.. or 3.3K. In practice we will allow for the gain of the transistors being lower at the maximum current or the supply voltage to be a little lower by using a value that is about 1/10th of the calculated value which in this case will be 330 ohms.
If the supply is 5V instead of 12V the numbers give a value for R of ..
R = (5 - 2)/.003
R = 1000 ohms
.. which gives a practical value of 100 ohms.
So that's it, well not quite. If you're driving this from low voltage logic and the motor supply is higher than the logic supply it still may not work. For a given supply voltage to switch the transistors off you will need to raise the input voltage to ..
Voff >= Vsupply - 2*VBE
.. so for 12V supply ..
Voff >= 12 - 2*0.6
Voff >= 12 - 1.2
Voff >= 10.8 volts
.. not good if you're using 5V logic.
To get round this the PNP driver circuits are replaced with NPN equivalents and the circuit now needs 2*VBE to turn on, less to be off so it switches at about 1.2 volts at the base of the driver.
But there's one last thing to do, work out the driver transistor base resistor. We know from before that we need a minimum of 3mA of base burrent to turn on the output transistors, this current is the collector current of the driver transistors. So using the gain to work out the driver base current we get ..
Ib = Ic/Hfe
Ib = 3/200
Ib = 0.015mA
Like before we have the base current that is needed to turn on the driver transistors but to find the resistor value we need to find the voltage that will appear across the resistor.
Assuming a logic supply of 5V ..
Vr = 5 - 2*VBE
Vr = 5 - 1.2
Vr = 3.8 volts
.. and this gives a resistor value of ..
R = V/I
R = 3.8/.000015
R = 253333.33 ohms
.. and using the 1/10th scale for a practical value gives 25333 ohms, then taking the next lower prefered value gives a driver base resistor of 22K ohms.
The final circuit becomes ..

There will be a test. 8^)=
Lee.
(Jeff can you copy the images to the Denial machine as I can't say how long they will remain available, ta.)
Even with the extra transistors there is no protection against overcurrent. This may be ok for a toy that is only expected to be used for < 100 hours in it's lifetime (and there are other reasons why the toy doesn't die immediately) but isn't good in practice.
Adding two resistors as below will protect the circuit against overcurrent but still allow the transistors to be turned hard on and reduce switch losses (it won't get as hot as one that doesn't).
But how do you calculate the resistor values? Get the parameters for the transistors used, both the 2N2222 and 2N2907 have similar specs, and find the gain. This is usually labeled Hfe and will probably appear like this.
Hfe 200 @ 150mA Ic
So the gain is 200, don't worry about the '@ 150mA Ic', this is just the current at which the gain is specified.
Next you need the current that you want to switch, the 2N2907 can handle 600mA Ic max and to switch that will need ..
Ib = Ic/Hfe
Ib = 600/200
Ib = 3mA
So now we have the base current that is needed to turn on the output transistors but to find the resistor value we need to find the voltage that will appear across the resistor.
Assuming a supply of 12V
Vr = 12 - 3*VBE - Vsat
Where VBE is the base emitter volt drop for the three transistors and Vsat is the minimum voltage across the driver transistor when it is on. plugging in the numbers gives ..
Vr = 12 - 3*0.6 - 0.2
Vr = 12 - 1.8 - 0.2
Vr = 10 volts
Now we can work out a value for R using ohms law ..
R = V/I
R = 10/.003
R = 3333.33 ohms
.. or 3.3K. In practice we will allow for the gain of the transistors being lower at the maximum current or the supply voltage to be a little lower by using a value that is about 1/10th of the calculated value which in this case will be 330 ohms.
If the supply is 5V instead of 12V the numbers give a value for R of ..
R = (5 - 2)/.003
R = 1000 ohms
.. which gives a practical value of 100 ohms.
So that's it, well not quite. If you're driving this from low voltage logic and the motor supply is higher than the logic supply it still may not work. For a given supply voltage to switch the transistors off you will need to raise the input voltage to ..
Voff >= Vsupply - 2*VBE
.. so for 12V supply ..
Voff >= 12 - 2*0.6
Voff >= 12 - 1.2
Voff >= 10.8 volts
.. not good if you're using 5V logic.
To get round this the PNP driver circuits are replaced with NPN equivalents and the circuit now needs 2*VBE to turn on, less to be off so it switches at about 1.2 volts at the base of the driver.
But there's one last thing to do, work out the driver transistor base resistor. We know from before that we need a minimum of 3mA of base burrent to turn on the output transistors, this current is the collector current of the driver transistors. So using the gain to work out the driver base current we get ..
Ib = Ic/Hfe
Ib = 3/200
Ib = 0.015mA
Like before we have the base current that is needed to turn on the driver transistors but to find the resistor value we need to find the voltage that will appear across the resistor.
Assuming a logic supply of 5V ..
Vr = 5 - 2*VBE
Vr = 5 - 1.2
Vr = 3.8 volts
.. and this gives a resistor value of ..
R = V/I
R = 3.8/.000015
R = 253333.33 ohms
.. and using the 1/10th scale for a practical value gives 25333 ohms, then taking the next lower prefered value gives a driver base resistor of 22K ohms.
The final circuit becomes ..
There will be a test. 8^)=
Lee.
(Jeff can you copy the images to the Denial machine as I can't say how long they will remain available, ta.)
-
Centallica
- Pinballer
- Posts: 1090
- Joined: Wed Feb 02, 2005 11:26 am
thanks Leeeee!
i have to wait until the electronics store gets some more transistors in.
i guess i could use 3904's and 3906's instead, and just drop the resister values for the inputs, as i think the ratio's for everything else are like the higher power transistors.
until they get some stocked, i think i will go by radio shack tonight and pick up a texas instruments CD4010 chip, which is an octal buffer, and use that to help control the motors.
chris
Ic max is only 200mA with a gain of 100 so the resistor values would be 1.5 times those for the 2N2xxx transistors.i guess i could use 3904's and 3906's instead, and just drop the resister values for the inputs, as i think the ratio's for everything else are like the higher power transistors.
If you do make sure you use pulldowns on the inputs or when you switch the machine on the user port will be all inputs, the buffer will see that as logic 1, the buffer outputs will all be logic 1 and all four transistors will be on. Magic smoke time.i think i will go by radio shack tonight and pick up a texas instruments CD4010 chip, which is an octal buffer, and use that to help control the motors.
When you build circuits like this you have to consider what the hardware will do before your software starts twiddling the bits.
Lee.
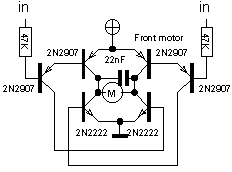
how does this look Leeeeee?
i tried to copy your circuit, so that way i could try and get a better idea on how it works:
http://web.ncf.ca/ex809/circuit.gif
chris
i tried to copy your circuit, so that way i could try and get a better idea on how it works:
http://web.ncf.ca/ex809/circuit.gif
chris
Almost, you must have a crossover somewhere so that the current flows through the motor. In your circuit the current will go straight through the left or right hand PNP/NPN pair.
Also for 5V supply use a 150 ohm driver transistir collector R, I usually use 12V supplies for motors but then I usually steal them from scrap printers so they are 12V motors.
New picture here ..
http://www.themotionstore.com/leeedavis ... ircuit.gif
.. the arrows show the current flow, blue if the left side is on, red if the right side is on.
Lee.


Yay! you did it!
and i want to thank everyone else who helped too!
the circuit works great!
i was going to test on two LED's pinned in reverse to each other, but decided to go right away to the 'bot.
bingo!!!
i just finished writing a little program, so the robot body moves left or right and you can toggle it to either go in continuous movement or in step wise fashion.
i hope you don't find this too corny, but i am renaming the robot to:
"General Leeeeee"
chris